Clay Landscapes

Landscapes before glazing and final firing

Materials

  • Clay rolled flat and in chunks

  • Flat boards (ours are 4"x12") for a surface

Instructions

  1. Lay the flat piece of clay on the flat board for stability. Use chunks of clay to build. Create a landscape. It could include things such as buildings, walls, trees, and statues.

  2. Fire in a kiln, glaze, and fire again.

Tips

  • Make sure that all the pieces are very well attached and there are no fragile parts. They easily break off.

Woven Heart Baskets

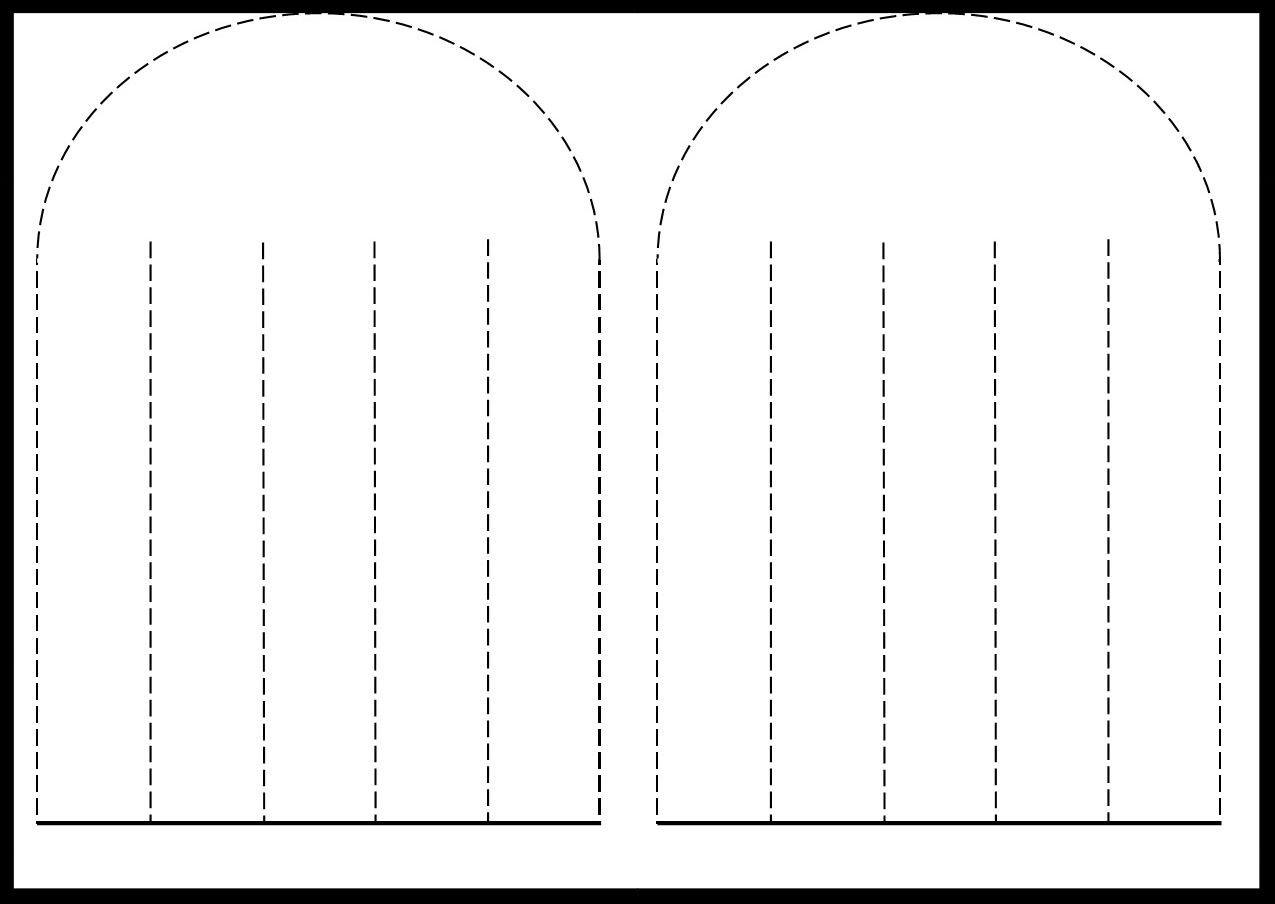
Woven heart baskets look cute when finished. Stuffed with a few pieces of candy, they make adorable Valentine's Day gifts. This pattern will make 2 woven baskets.

Fair warning, this project is difficult for a lot of kids---definitely young ones.

Materials

  • Heart pattern printed on 2 different colors of paper (PDF at the bottom of the page)
  • Scissors

Instructions

  1. Print out the pattern. Fold the paper in half along the flat bottom line of the pattern.
  2. Cut along the dotted lines.
  3. (see pictures below)
 

3. This is what you have now. The flat bottom of the arches will become the pocket of the basket. Let's call the blue arch, Arch1 and the yellow arch, Arch 2. Each of their 5 strips are indicated by letters.

4.  Take strip 2a and open it up slightly. Slip 1a (closed) through the opening of 2a.

5. Now, take 1a and open it up slightly. Slip 2b through this opening.

6. Continue to weave the strips together in the alternating pattern until there is nothing left.  2a---> (through) 1b, 1b--->2b, 1a--->2c, 2c--->1b, 1c--->2a, 2b--->1c, 1c--->2c, etc.

7. Once completed, the basket will look like this. Open it from the top.

 
Printable PDF Pattern

Printable PDF Pattern

Tips

  • Affix a paper strip to the top to create a handle for the basket, or...
  • To make a woven heart that isn't a basket, print out the patterns, but do not fold the papers in half. Cut out the pattern completely and weave. Use tape or glue to hold the ends of the strips down.

Flextangles

Flextangles are so much fun to create and play with. They are a nice activity because they don’t take a lot of materials, but can easily kill some time.

The Flextangle template can be found by clicking on the link below. The instructions are even on the template, so there is no need to include them here.

Materials


Tips

  • A tacky glue such as rubber cement or tacky craft glue is best. Glue sticks will not hold the paper together well.

Source

Puzzle Piece Murals

As the title suggests, this mural is in pieces. Each piece is printed out, colored in, and hung on a wall in order. For our mural, we bought a PDF kit of pieces to print out. If you want to do the same, the link is in is the Source section below. If you don't want to buy a kit, find an image to color, adjust the size, and print it out in pieces.

"Baby (Cradle)" by Gustav Klimt.

There are puzzle piece murals for paintings created by Gustav Klimt on Art Projects for Kids.

Materials

  • Printed out copies of each puzzle piece

  • Markers

  • Tape

Instructions

  1. Color puzzle pieces. 

  2. Put all of the colored pieces in order.

  3. Hang on wall with tape.

Tips

  • Color in, or at least decorate, the whole page (even in-between/empty spaces). It makes the finished project more striking and fun to look at.

  • This is a good project for older and younger kids to do together.

Sources

You-in-a-Cup Pop-Up

This is our little version of a jack-in-the-box. But instead of a clown jumping out, it's you!

Materials

  • Yogurt container or other plastic container with lid

  • 2 pieces of construction paper of equal size cut into 1-inch wide strips

  • Printed photo of kid's face

  • Glue sticks

  • Scissors

Instructions

  1. Make a paper accordion spring: overlap 2 paper strips at the ends to form an L shape. Glue or tape together. Tightly fold the bottom strip over the top strip. Repeat with the opposite strip. Continue doing this until the length of the strips are folded. Tape or glue the other strips onto the folded strips when needed. Glue the final flaps together. You now have a paper spring. 

  2. Glue one end of the spring inside cup. 

  3. Cut out and glue the picture of the kid’s face to the other end and place lid on top. When opened, the face springs out at you.