


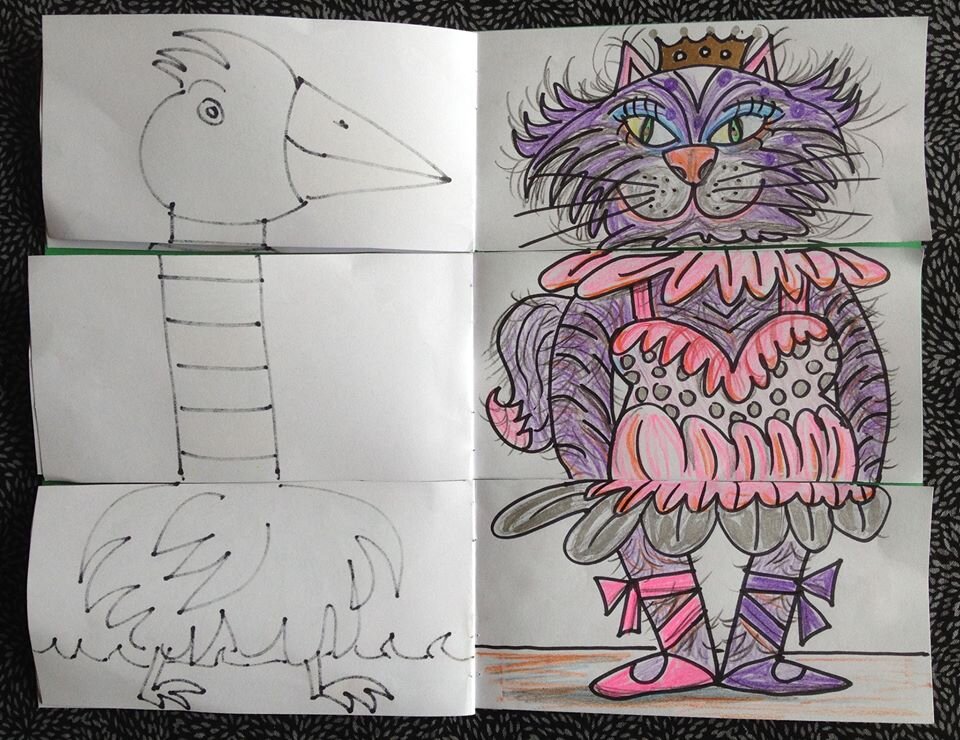

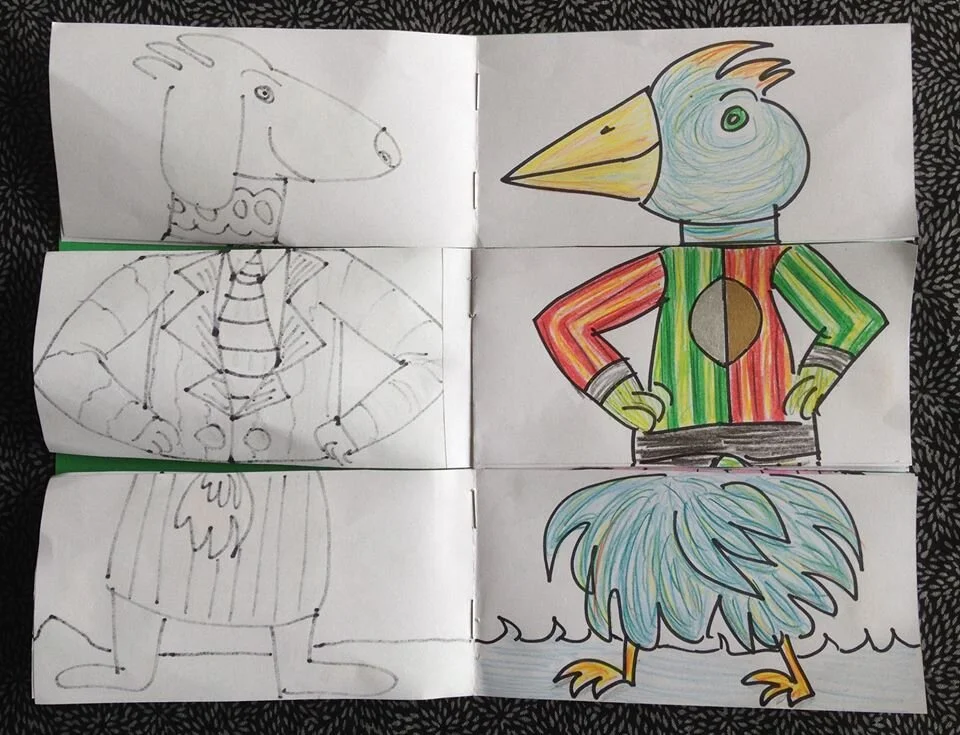


A moving picture book is a variation of what’s called an Exquisite Corpse picture. It is a freestyle representation of a human (or non-human) body with the top portion containing a head, the middle portion containing a torso and the bottom portion containing legs and feet (or claws, paws or hooves).
Supplies: 8 ½ x 11 inch paper + colored pencils + markers +
8 ½ x 11 inch heavy paper for cover
Optional: magazine pictures
How to:
1) Fold the heavy paper in half and set aside.
2) Fold two pieces of the regular paper in half. This will create a book with four half pages.
3) Draw two horizontal lines on the front of each half page so as to divide each half page into 3 equal sections. There will be lines on one side of each of the four half pages.
4) On the front of each of the four half pages, draw and color a cartoon character. Make sure the head is in the top section, the torso is in the middle section, and the legs and feet are in the bottom section.
5) Cut each page on the two lines and nestle one piece of paper inside the other.
6) Put the two pages (four half pages) into the heavy paper and staple together on the fold to make a book.
7) Draw what you want on the cover and back of your book.
8) Have fun flipping the various pages to rearrange the cartoon characters you have drawn!
Optional: Take turns drawing different parts of the cartoon with someone else. See what you come up with.
PLAY DAY | CAST OF CHARACTERS + THEATRE BOX ARTBOX THEATRE PUPPETS
Thanks to Studio 6 Students + Mary Emge!


Supplies: plastic bottles + markers + glue stick + clear tape or masking tape + scissors + fabric, old gloves or socks + pipe cleaners + glue gun + aluminum foil + beads + white glue + buttons + bells + dried beans + tissue paper + pom poms + magazines + googly eyes + fun art supplies around the house
How to:
1) Find a plastic bottle.
2) Make aluminum foil horns, nose and/or hat. Attach them to the bottle with masking tape or glue gun.
3) Glue tissue paper or magazines to bottle. Or you can paper mache and then paint.
4) To create the body, make a pattern using your hand. Using the pattern, cut out material and sew or glue. Or use a glove.
5) Glue or tape the body to the bottom of the bottle.
Write a play. Add music. Entertain your family.
Optional: Find a large box similar to the one in the photo. Cut out a rectangle in front. Open the back so the flaps support the theatre upright. Set the box on a table. You now have a theatre. Color and/or decorate the theatre.
WHAT DO YOU SEE? | RORSCHACH PAINTING


Supplies: paper + paint
How to:
1) Fold a piece of paper in half, then unfold.
2) Randomly paint with one or more colors on one side of the fold.
3) Refold paper over paint and press.
4) Unfold paper. What do you see?
Make a Self-Portrait (Without looking in a mirror or photo!)


Supplies: glue stick + scissors + magazines or colored paper
+ markers
How to:
1) Imagine yourself.
2) Start with plain background or picture from a magazine.
3) Out of colored paper or magazines, cut out your head, nose, mouth, eyes, hair, hat, bow tie, horns, whatever you imagine.
4) Glue to background paper.
Examples: Alesia’s self-portrait + Studio 6 students’ self-portraits
Emotion Cylinder


How are you today? Express how you feel through the language of drawing. Make a changing emotion cylinder (or just free draw on paper!). Examples: Happy, Sad, Sleepy, or Angry (just draw--there are no mistakes!).
Supplies: Glue stick + clear tape or masking tape + scissors + heavy paper or cereal box cut open + markers + Optional: Magazines
How to:
1) Lay out two sheets of heavy paper or two cereal boxes cut to 11 ½ x 8 ½ inch rectangle.
2) On one of the pieces of paper, draw a small (about 2” diameter”) circle in the upper third of the paper. Make the circle using a circular container cap or by free hand.
3) Cut out the circle.
4) Draw a figure or glue a figure from a magazine around the cut out circle, pretending that the circle is the head.
5) Use the paper with the figure as a pattern. Lay it on top of the second piece of paper and draw a circle where the cut out circle is. Repeat this twice—once to left of your first circle and once to the right of you first circle so you have 3 circles about 1” apart.
6) You now have 3 circles. Draw your feelings or find faces from a magazine and cut out and place in the circle.
7) Attach a small tab to the top of the page with the three faces. This will help you turn the inside cylinder later on.
8) Make the first cylinder with the page with the faces and tape.
9) Make a second cylinder with the page with the figure by going around the first cylinder. Tape it.
Set the cylinder somewhere so everyone can see. This will warn them as to how you are feeling today!!